Week 12
7/18 - 7/22


We also worked on adding in a test for checking if the product is not in our database and inform the user with an error message played audibly through the bone conducting speaker.


Brand and Product Detection
The results of the testing were overall successful with only one product that was incorrectly identified. The Adobo blue bottle should have given an output of “this is abodo without pepper” however it gave the output “this is old bay blackened seasoning”. We believe that this is because it did not detect the adobo logo correctly, possibly due to lighting, and when running the OCR, it read the word seasoning and selected blackened seasoning from our product list. Overall, with a success rate of 93.33% we believe that the results of the real-world testing were a success.

Error Message
There are 2 different error messages that will output depending on the error that occurs. The first error message is for when there is no hand detected in the image. When this event occurs, the project will not be able to determine a selection. Therefore, the error message containing the string of text “No hand detected” is sent through the bone conducting headphones to inform the user. The project was tested 5 times with the user’s hand kept out of view.
No Hand Error Message

Nothing Detected Error Message

Battery Life
For testing the battery life of the project, we first charged the power supply fully as indicated by a green light that illuminates when the device is fully charged. Then we turned the camera on and let it run at maximum resolution for the duration of each test. A camera was placed in front of the raspberry pi and a clock to monitor the project during each trail run.

Operating Temperature
During the 5 trial runs ran the project and checked the CPU temperature using the shell command “vcgencmd measure_temp” we then recorded the maximum temperature that the CPU reached during each trial run.

Comfort
To test the comfort of the hat we allowed 5 people to try on the hat and give us their honest feedback. We asked each person to try them on and give a score to each category on a scale of 1 to 5, 5 being the best score and 1 being the worst.

Group
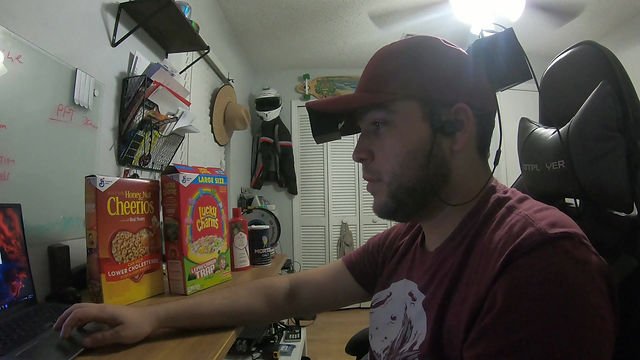
This week we focused on testing the project in a real world environment. First, we visited Target at a local shopping center, during the testing we ran into an issue while using the device. The camera would work on the first object detection but when moving to the next product there was an issue with the camera not taking a new picture and simply re-using the same picture we first took. After some troubleshooting we found that the camera needed to be initialized inside the main loop. We then re tested the device and were able to successfully identify 15 products in the store. The only issue we had was during a test on a Adobo seasoning product, where our device incorrectly identified it as Morton Salt.
Week 11
7/11 - 7/15
Group
This week, we managed to make great progress. After many long hours of troubleshooting, we managed to find the issues we were having with the install of PaddleOCR. The required library of PaddlePaddle needed a specific 64 bit C++ compiler version, one which is only supported on Debian 10, not Debian 11 as we were previously using. Once installing the correct image as well as PaddlePaddle, we then encountered further issues on the install of PaddleOCR as it specifically required the package of opencv-contrib-python version 4.4.0.46 installed. The install of that package however would fail every time as just recently in April, Scikit-build, a package dependency of opencv-contrib-python, had recently updated and was no longer compatible. The install package of opencv would force install the newest version and fail every time, so by editing the pyproject.toml file, the one that sets the package's dependencies we were able to use the older scikit-build version and finally install PaddleOCR.
Once everything was installed, it was just a matter of uploading our python code and editing for some final touches. Below is the image we used to test the raspberry pi's detection, as well as the voice output indicating it's prediction.
Currently, the program takes 6 seconds to load all of the models after which we can simply press the wireless button for it to take an image and begin detection. The detection currently takes between 16-18 seconds from the moment the button is pressed to the speaker audibly saying the predicted detection.
This week we also worked on collecting feedback from the visually impaired community to see what they thought about our project. To do this we joined a Facebook group known as "blind and Visually Impaired Friends.", this group has 5.1K members and with permission from the group admins, we decided to introduce ourselves and ask some questions regarding our project.


Week 10
7/4 - 7/8
Anthony
This week I focused on the report while Manuel troubleshot the installation of the python modules onto the raspberry pi and assisted Manuel with research when needed.
This week I was able to revise chapter 2 and draft chapters 4 and 5.
Manuel
This week's focus was on getting the project up and running in any way possible, I have spent a lot of time over the past week trying everything I could think of to have all of the modules properly working on the raspberry pi. I have tried using Ubuntu 18.04, 20.04 and 22.04 with no success, as well as Raspbian Bullseye 32 and 64 bit, and Raspbian Buster 32 and 64 bit. So far I have been unable to have PaddleOCR working on the raspberry pi with any of these different OS versions. I have however found the root of the problem, as PaddleOCR requires the PaddlePaddle library, PaddlePaddle has it's own set of requirements, the main one being the c++ compiler. For installation of PaddlePaddle, we require GCC 8 64 bit, which is not included in any of the official Raspberry Pi OS images. I will continue to test different versions as well as find a way to properly install the correct C++ compiler to hopefully have all of our modules finally installed and working on the raspberry pi.
Since every attempt takes many hours of waiting for installs and compiling of modules, I used the time in between research and installation to attempt making our project work on an android device. I had found an application that is able to load an old version of PaddleOCR V2, and was able to adapt the code to work with the newer V3 that our project is based on. While I was able to obtain detection boxes, I have not yet figured out how to extract the text from the model's detection.

Week 9
6/27 - 7/1

Group Work
This week's focus was to have PaddleOCR installed and working on the raspberry pi in order to perform real-world tests. We were however unable to have the PaddleOCR module installed on the raspberry pi. This was after many multiple attempts.
Two of the main requirements of PaddleOCR are the PaddlePaddle module, and Opencv. These are both compatible with the raspberry pi in the forms of Paddle Lite, and simply opencv. And while we were successful in installing both Paddle Lite and opencv. The PaddleOCR installation still fails due to not being able to detect opencv.
We have attempted installation on virtual environments within the pi, and even resetting the pi and attempting the installation on a newer OS version, Raspbian Bullseye. This still didn't work and instead created further conflicts with other modules, like mediapipe which has only compatibility with Raspbian Buster and not Raspbian Bullseye.
Each attempt of installing PaddleOCR would take a minimum of one hour as the main issue came from opencv, we decided to build the setup wheels to install the module within the pi, which would take one hour and 15 minutes of processing time. While the installation would seemingly work, and there were no errors, as well as being able to use opencv within python, when attempting to then install PaddleOCR, it would error out due to an opencv error.
After a long time of attempts to get PaddleOCR working on the raspberry pi, we decided to look into other OCR methods instead, these methods include Keras OCR and Tesseract OCR. They are not nearly as accurate as PaddleOCR, but they are the only ones that we have been able to have working on the raspberry pi. From these two options, keras OCR is more accurate, but significantly slower than tesseract OCR
From the following image, we have the OCR results from both Keras OCR and Tesseract.
Keras OCR Result:
"ALMONDS MOREREAL Kellvyg's CEREAL Almond Vanilla& Now with SPECIAL Nauraly Flavored wit Crunchy Wheat & Rice Flakes Other Naturl Flavors with Almonds&Vanilla PERCUP SERVING 90236"
Tesseract OCR Result:
AF fe14 REA netMONDS 7 NUM Wh ee
Keras OCR is still much accurate than pytesseract, however processing time is about 15 times longer than that of tesseract. This next week we will be performing real world tests using both of these OCR methods and determining the best possible one to use.
Progress Log
Week 8
6/20 - 6/24
Group Work
At this point in the project we are installing the required modules onto the raspberry pi. This will enable us to use the algorithms built in python and run them on the raspberry pi.
The required modules that need to be installed are YoloV5 / PyTorch, Media Pipe / Tensorflow, and PaddleOCR.
YoloV5 / PyTorch:
YoloV5 can be installed via cloning a GitHub repository and pip installing the requirements. Then using the Jupyter notebook that was written for the project we can then test the object detection algorithm by running the python script on the raspberry pi.
# clone
git clone https://github.com/ultralytics/yolov5
# change the working directory to yolov5
cd yolov5
# install
pip install -r requirements.txt # install
Object Detection Test

Paddle OCR
For the optical character recognition in our project we are using Paddle OCR, the installation instructions are as follows.
sudo pip3 install paddleocr
When attempting to build the module (the last shell command) we get the following error.

The error message states that the wheel for opencv-contrib-python use PEP 517 cannot be installed directly.
Next, we decided to try updating the pip setuptools wheel by running the shell command below.
pip install --upgrade pip setuptools wheel
The attempt to install PaddleOCR takes a long time, so currently we are still waiting to see the results of our new attempt to install the module.
Currently, the only component we are missing for a fully working raspberry pi is the PaddleOCR library, as it requires PaddlePaddle that isn't native to the Raspberry Pi 4, so some workarounds have to be made in order to install the module properly. Once we have this completed, as we have nearly all of the main script finished, we can soon begin a more rigorous testing phase of our device.
Additionally, we worked on further improving our detection, the images below have the logo detection turned off, so when no logo is detected, we can then fall back on the OCR to cross reference a list of brands to best estimate the product. The final product will state when no logo was detected and that this is our device's best current guess, and to try again to ensure accuracy. While these examples are correct, there is no guarantee it will properly detect the brands as the OCR's average accuracy is much lower than that of our YOLOv5 Logo detection model, and the OCR method is simply our device's fallback option.


Week 7
6/13 - 6/17
Anthony
-
Setup Text-To-Speech on raspberry pi
-
Installed PyTorch and YoloV5 onto the raspberry pi
Text-To-Speech
The Text-To-Speech module we will be using is the pyttsx3 module. To install it we used the command line and pip-installed pyttsx3. Once installed we can then import it into our python script and use it to convert text to speech and send it to the audio output on the raspberry pi.
import pyttsx3
engine = pyttsx3.init()
engine.say('Hello World')
engine.runAndWait()
In this example used to test the functionality of the Text-To-Speach module, we created a variable engine and set it equal to pyttsx3.init() this way we don't have to write that out every time, simplifying the code. To make the raspberry pi say something we use the command engine.say() next in order to make the program wait for the Text-To-Speach to finish we used the command engine.runAndWait(). We tested this on the raspberry pi with the bone-conducting headphones and were successful in audibly outputting the Text-To-Speach to the bone-conducting headphones.
YoloV5 and PyTorch
To install YoloV5 I cloned the following git hub repository https://github.com/ultralytics/yolov5 using shell commands on the raspberry pi. When installing the requirements for this module I an into a compatibility error for PyTorch which is required for for our refined model detection.

looking into the issue PyTorch is not compatible with 32-bit operating systems, which should be fine since the raspberry pi 4 can support 64-bit operating systems. Running the shell command uname -m I found that the current operating system that was installed was armv71, this is a 32-bit operating system which is causing the issue.
To fix this we re-wrote the operating system to the SD card and attempted to install the requirements again. This time we were successful.

Manuel
This week's focus was ensuring we can separate individual products in order to easily select one using our hand. After much research we were able to find a generic object localizer based on the MobileNet V2 framework for TensorFlow 2.0 capable of detecting separate generic objects within a scene. In the following image using the object localizer we are able to create bounding boxes around each product.
With the bounding boxes created we can now easily crop out the image and limit the amount of data we gather from the OCR process, thus increasing the accuracy of our detection. We can now apply our hand detection to the image and using the thumb landmark's location relative to the image we can determine what general bounding box the hand is selecting using the following function.
def isInside(count, boxes, finger, h, w):
point = Point(finger)
for i in range(count):
loc = boxes[i] * [h, w, h, w]
polygon = Polygon([(loc[1],loc[0]),(loc[1],loc[2]),(loc[3],loc[0]),(loc[3],loc[2])])
#print(polygon)
if polygon.contains(point):
return i
return -1
Using the shapely library, we can create a polygon from the bounding box and use the thumb's landmarks as a point to determine which of the multiple bounding boxes it is selecting. We can then crop out that selected bounding box for further detection. The object localizer however, doesn't always perfectly separate products, especially if they are too close together, and are too similar in color


Week 6
6/6 - 6/10
Anthony
-
Finished Assembly of the Hat
-
Setup Bluetooth Button
-
Created a python script to control the camera with the button
The construction of the hat is complete, it fits comfortably and the weight of the added parts is not noticable.


In order to capture the images in real-time, we will be using a Bluetooth button and PiCamera connected to the raspberry pi. The Raspberry pi 4 has built-in Bluetooth 5.0 and the Bluetooth remote we are using is also using Bluetooth 5.0 technology. First, we connected the button to the raspberry pi and verified that the Bluetooth was recognized by the raspberry pi.

As seen in the above picture it has been recognized as Event 6, knowing this we can then use this to control the camera in a python script. Using evdev and picamera modules the scrip can be writen as follows.
for event in ABShutter3.read_loop():
if event.type == ecodes.EV_KEY:
if event.value == EV_VAL_PRESSED:
if event.code == BTN_SHUTTER:
#sets up camera to disbale camera once complete
#this is to avoid multiple cameras being setup at the same time
with picamera.PiCamera() as camera:
camera.resolution = (1280,720)
camera.start_preview()
sleep(2)
camera.capture ('/home/wavi/tflite1/Test_images/image.jpg')
camera.stop_preview()
#confirmation for testing
print('picture taken')
The camera resolution is set to 1280x720 which meets our engineering specifications for the camera module. In the code, we use the with-as structure so that we avoid creating multiple instances of cameras throughout the code. Also, we allow the program to sleep for 2 seconds so that the camera has time to adjust to the lighting and auto focus.

Manuel
This week our goal was to add general box detection to our YOLO detection model. With general box detection, we could then use the detected hand's position to then select the correct box. This would allow us to crop the selection, and only run logo and OCR detections on that specific area. This however did not work well and requires more work and research. The result of our attempt created various false positives that would severely lower our detection's accuracy, as well as drastically lower performance as the model was detecting too much.
Instead, a new solution was found that doesn't use general box detection or hand detection. This solution is rather accurate and much faster as it does not use the hand detection model at all. More testing is required however to obtain more quantified results. The solution uses the logo detection and OCR in conjunction with each other to obtain the closest match to a product.
The first step is to use our logo detection model and obtain the prediction with the highest accuracy. This will allow us to create a path to our products list text file containing that brand's numerous products.
results = model(img) # model's detection on image saved onto results variable
pandaRes = results.pandas().xyxy[0] # img1 predictions (pandas)
res_list = pandaRes.values.tolist() #pandas converted to list
topPredict = res_list[0][6] # top detected logo name
product_path = os.path.join('Product Lists', topPredict, topPredict + "_products.txt")
output:
'Product Lists\\dove\\dove_products.txt'
This will generally be the largest and closest one to the camera, we can then OCR the entire scene and using the detection's box point locations we can determine their height and sort by the top 15 largest words detected using our own sortOCR function.
def sortOCR(result):
top = [[],[]]
newRes = []
for res in result:
length = np.sum(np.subtract(res[0][1], res[0][0]))
height = np.sum(np.subtract(res[0][2], res[0][1]))
top.append([height,res])
top.sort()
top.pop(0)
top.pop(0)
top.reverse()
for i in range(0, len(top)):
#print(top[i][0])
newRes.append(top[i][1])
return newRes
With the OCR results sorted and logo detected, we can open up that products text file and compare the OCR results to the text file line by line, and using the 'fuzzyWuzzy' library we can obtain the closest match to the list.
productsFile = open(product_path, 'r') # opens products text file
Lines = productsFile.readlines() # creates a list with every line from the file
productsFile.close()
s = ' '.join([ocr[1][0] for ocr in ocrRes[0:15]]) # converts the top 15 OCR results into a single string
testlist = [max([(fuzz.token_set_ratio(s,j),j) for j in Lines])] # compares the string to the Lines list
outText = ("This is {} {}".format(topPredict,testlist[0][1])) # outputs our results
Below are some of our tests, the text above the image is automatically generated using the code above


This method doesn't always work however, specifically for OldSpice products. As you see below on the left we are able to correctly identify the product, however on the right we are obtaining the incorrect result. The reason this is happening is because the OCR results contain a lot of "junk" that is repeated in every single product. Below are the top 15 OCR results from the image on the right, as you can see this contains things like 'NETWT' as well as numbers that are used in nearly every product that don't help us identify the product. To solve this we believe can create a filter for each brand to remove most of these repeating values and increase our detection accuracy.
'NIGHIPANTHER Old Spice NETWT. 3.00Z(85g) TRIPLE PROTECTION SMELL SNIFFWORTHY ALUMINUM*FREE DEODORANT DEODORANT'


Week 5
5/30 -6/3
Anthony
-
Prepared images using labelimg.
-
Started Assembling the hat.
Using software called labelimg I prepared the images we collected for training custom TensorFlow models. Labelimg is a graphical image annotation tool, it is written in python and in our case is used to outline and label the logos in our collected images. We can then use the XML files that are saved to create custom TensorFlow models that will detect the logo in the images.

Using SolidEdge a computer-aided design software created by Seimens I created an enclosure to contain the raspberry pi and attach it to the back of the hat. The housing has cutouts to access the IO and charging ports. also, there is a cut-out for the camera ribbon cable to pass through.
I am also printing a housing to contain the camera and secure it to the front of the hat and lid that will cover the raspberry pi.


Manuel
For this week, my goal was to greatly improve logo detection. After much research, I found the best way to improve the model is to simply have more data to give the model to train with, however finding and manually labeling thousands of images would not be very practical so I looked into data augmentation. With data augmentation you can edit a single image and create many variations of it to increase the training data you have. In my case, I tried the following data augmentation options:
-
random horizontal flip
-
random 90 degree rotation
-
random black patches
-
random image crop
-
random hue adjustment
-
random contrast adjustment
-
random brightness adjustment
-
random saturation
With the following I was able to increase my model's accuracy between 5% to 10% depending on the logo. This however was not good enough as my model was still having trouble detecting logos at an angle. This is when I decided to research PyTorch as it had other machine learning solutions for object detection, specifically YOLOv5 which includes models similar to the models I was previously using, however these models are based on a PyTorch framework rather than tensorflow. Below is a graph showing the speed and accuracy comparison of YOLO models on the same COCO dataset using PyTorch compared to EfficientNet using Tensorflow.
YOLOv5 vs EfficientNet(https://pytorch.org/hub/ultralytics_yolov5/)
The results I was able to obtain were a massive improvement compared to the other model types I was using. With YOLOv5 the model was able to detect logos at an angle and even further away all while detecting faster. To compare, below are the images I had used to test last week, on the left we have our previous model's detection and on the right we have our new YOLOv5 detection.


As you can see, my previous model was unable to detect logos in various use cases, however our new YOLOv5 model is able to accurately detect where our model previously couldn't, as well as greatly improve detection in other tests.
Now that I am able to accurately detect these logos, I can now focus on using OCR to enhance the recognition of the products. Using PaddleOCR from https://github.com/PaddlePaddle/PaddleOCR, I am able to read the text in the image very accurately to give us further information about the product. Using the oldspice image as an example, we can now extract the text and obtain the following:
With this information we can then create a list of Old Spice products and compare the OCR results with our list to determine that this is an "Old Spice Pure Sport High Endurance Deodorant". Creating a list for each brand we are detecting will be our focus for the next week.


Week 4
5/21 - 5/27
Anthony
-
Collected training images
-
Created a python function for implementing object detection on images.
Training images collected for Crest toothpaste

We have decided on 15 items from 5 different products.
-
Cereal
-
Raisin Bran
-
Lucky Charms
-
Cheerios
-
-
Soda
-
Coke
-
Dr. Pepper
-
Pepsi
-
-
Toothpaste
-
Crest
-
Colgate
-
Oral B
-
-
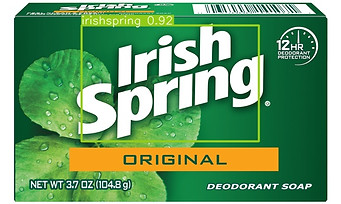
Bath Soap
-
Dove
-
Old Spice
-
Irish Spring
-
-
Seasoning
-
Morton
-
Adobo
-
Old Bay
-
For each of these items, we have collected various images from different angles and lighting conditions. These images will then be used to train custom TensorFlow models.
Python Function for implementing TensorFlow Object Detection
To implement TensorFlow object detection in python I created a function called detect_picture(). The model name variable or model directory tells the program where the TensorFlow models are located in this example, we are using the Coco_TFlite_model. The image directory variable tells the code the location of the folder where the pictures are saved.
Section of Code from detect_picture function
def detect_picture():
# Define and parse input arguments
parser = argparse.ArgumentParser()
parser.add_argument('--modeldir', help='Folder the .tflite file is located in',
default='Coco_TFlite_model')
parser.add_argument('--graph', help='Name of the .tflite file, if different than detect.tflite',
default='detect.tflite')
parser.add_argument('--labels', help='Name of the labelmap file, if different than labelmap.txt',
default='labelmap.txt')
parser.add_argument('--threshold', help='Minimum confidence threshold for displaying detected objects',
default=0.5)
parser.add_argument('--image', help='Name of the single image to perform detection on. To run detection on multiple images, use --imagedir',
default=None)
parser.add_argument('--imagedir', help='Name of the folder containing images to perform detection on. Folder must contain only images.',
default='Test_images')
parser.add_argument('--edgetpu', help='Use Coral Edge TPU Accelerator to speed up detection',
action='store_true')
args = parser.parse_args()
MODEL_NAME = args.modeldir
GRAPH_NAME = args.graph
LABELMAP_NAME = args.labels
min_conf_threshold = float(args.threshold)
use_TPU = args.edgetpu
# Parse input image name and directory.
IM_NAME = args.image
IM_DIR = args.imagedir
Input:
from Wavi_functions import detect_picture
detect_picture()
Output:

Manuel
This week, I first focused on hand detection using MediaPipe. MediaPipe is an open source framework from Google that to create machine learning. With it comes the ability to detect multiple hands and create a nodal frame of each hand. The following image shows the guide for each node of the hand we are able to detect and track.
We can easily install MediaPipe into our python environment using the following command in a pip enabled command prompt:
pip install mediapipe opencv-python
We can then go into python and import MediaPipe and use it's functions, and then create our hand and drawing variables using the following code.
import mediapipe as mp
mp_drawing = mp.solutions.drawing_utils
mp_hands = mp.solutions.hands
The variable mp_hands will be used to detect the actual hand from a frame, and the mp_drawing variable will be used to draw the overlay on top of our input frame. The detection will automatically detect the multiple hands and write it into an array called multi_hand_landmarks, and then classify the landmarks as left or right handed. We can then access the classification, label and coordinates for us to manipulate, as well as the accuracy percentage, and in this case we can draw a label on the 'WRIST' landmark and overlay it on the frame.
def get_label(index, hand, results):
output = None
for idx, classification in enumerate(results.multi_handedness):
if classification.classification[0].index == index:
# Process results
label = classification.classification[0].label
score = classification.classification[0].score
text = '{} {}'.format(label, round(score, 2))
# Extract Coordinates
coords = tuple(np.multiply(
np.array((hand.landmark[mp_hands.HandLandmark.WRIST].x, hand.landmark[mp_hands.HandLandmark.WRIST].y)),
[640,480]).astype(int))
output = text, coords
return output
With this function we can now instantiate the mp_hands detection into a while loop to detect our own hands using a webcam.
import cv
cap = cv2.VideoCapture(0)
with mp_hands.Hands(min_detection_confidence=0.8, min_tracking_confidence=0.5) as hands:
while cap.isOpened():
ret, frame = cap.read()
# BGR 2 RGB
image = cv2.cvtColor(frame, cv2.COLOR_BGR2RGB)
# Flip on horizontal
image = cv2.flip(image, 1)
# Set flag
image.flags.writeable = False
# Detections
results = hands.process(image)
# Set flag to true
image.flags.writeable = True
# RGB 2 BGR
image = cv2.cvtColor(image, cv2.COLOR_RGB2BGR)
# Detections
#print(results)
# Rendering results
if results.multi_hand_landmarks:
for num, hand in enumerate(results.multi_hand_landmarks):
mp_drawing.draw_landmarks(image, hand, mp_hands.HAND_CONNECTIONS,
mp_drawing.DrawingSpec(color=(121, 22, 76), thickness=2, circle_radius=4),
mp_drawing.DrawingSpec(color=(250, 44, 250), thickness=2, circle_radius=2),
)
# Render left or right detection
if get_label(num, hand, results):
text, coord = get_label(num, hand, results)
cv2.putText(image, text, coord, cv2.FONT_HERSHEY_SIMPLEX, 1, (255, 255, 255), 2, cv2.LINE_AA)
# Save our image
#cv2.imwrite(os.path.join('Output Images', '{}.jpg'.format(uuid.uuid1())), image)
cv2.imshow('Hand Tracking', image)
if cv2.waitKey(10) & 0xFF == ord('q'):
break
cap.release()
cv2.destroyAllWindows()
My next goal was to improve on our current model, and train more logos into it, using the dataset Anthony was able to gather, I was able to create a new model that can detect 14 logos. This model however while it works well with some logos, struggles with others, as well as struggling to detect with certain angles. The following images are evaluation images used to determine the model's accuracy. On the left is our model's detection and on the right is what it should be detecting as that is a manually labeled image.
As you can see, the model is able to detect the logos, as long as they are head on and not rotated, and the accuracy decreases the more the object is moved. Originally, I was creating the model using the SSD_Mobilenet model as a baseline, which is a unified network for object detection pre-trained model on the 2017 coco database with the ability to train for object detection. That model I was using was 320x320 which means it would convert the input image to a resolution of 320x320 and then run detection. I am now testing and using a Centernet_Resnet50 model with a resolution of 512x512, this is a slower detection model but the accuracy increases a total of 54 percent when compared to the previously used model. This might not be the final base model used, as I will continue testing different variations for speed and accuracy.
My next step was to combine the hand detection and logo detection. This is done by running each model individually, we first run the hand detection and then pass that overlayed image onto the logo model's detection process and output the final image.


Week 3
5/16 - 5/20
Anthony
-
Installed Tensorflow Lite onto the raspberry pi
-
Configured the camera using raspi-config.
-
installed the Coco dataset Tensorflow Lite models and ran tests using the raspberry pi and its camera.
-
Tested the custom tensorflow models developed by Manuel on the raspberry pi.
Setting up Camera

Running Object Detection using Coco dataset

To prepare the raspberry pi for object detection via the pi camera I had to go into the raspberry pi's configuration menu and enable the legacy camera option. Next, I downloaded Tensorflow Lite by following the TensorFlow Lite tutorial found on the following Github link (https://github.com/EdjeElectronics/TensorFlow-Lite-Object-Detection-on-Android-and-Raspberry-Pi). I also downloaded the Coco data set found on Tensorflow's website. The Coco dataset is a library of pre-trained models that Google has created. It contains TensorFlow models for things such as person, chair, dog, car, cellphone, ect. and is perfect for testing the functionality of Tensorflow Lite on the raspberry pi.
Running Object Detection using custom model for Crest and Morton


Once the TensorFlow Lite object detection python script was confirmed to be working I then downloaded the custom TensorFlow models trained by Manuel and ran them through 2 test images. On the right, we can see that it correctly identified the crest logo however we received a false positive on Morton. On the left, the pi had correctly identified the Morton logo however it detected the product multiple times. We believe that by running the training algorithm using more sample images the object detection will become more accurate and produce fewer false positives.
Manuel
I Trained an SSD MobileNet V2 FPNLite model to recognize two specific logos, Crest logo and Morton Salt Logo. To do so, I first needed to obtain images and label them using LabelImg to draw out the section in the image that makes up the logos, I however only used 6 images per logo to lower the training time for now.
The first step is downloading the SSD MobileNet model, and then creating the label map for training, in this case "crest" and "morton" as those are the two logos that I am currently training into this model. The next step is creating the training TF records using a generate tf record python program from https://github.com/nicknochnack/GenerateTFRecord. Once the TF records are created, we then need to copy the model's config to our custom model's folder, and update the config for Transfer Learning using the object detection library from https://github.com/tensorflow/models. With this we can now train the model by generating and running the following command on our Anaconda Tensorflow Environment.
We can then take a look at the Tensorboard training metrics, on the left we see the first attempt with a loss of over 10 at the end, that model didnt work at all so I had to re-train another one after fixing the issues I had, and obtained more normal losses of 0.35. I was then able to run the model and test for object detection on the logos.


Week 2
5/9 -5/13
Manuel
-
Setup Tensorflow to use GPU for faster detection by installing Cuda kit, cuDNN and setting up environment variables
-
Setup Pycharm Project to use Miniconda Tensorflow Environment
-
Test object detection using a pre-trained model using pycharm


Anthony
-
Assembled the IMX219 Camera
-
Assembled the power supply for the Raspberry Pi
-
Installed the OS onto the Raspberry Pi
-
Updated and installed the Raspberry Pi software


Week 1
5/2 - 5/6
Anthony
-
Sourced and ordered the required parts.
Manuel
-
Setup Tensorflow using Miniconda3 with the following instructions
<Install Miniconda3, Python 3.9>
<Run Miniconda command prompt>
conda create -n tensorflow pip python=3.9
conda activate tensorflow
pip install --ignore-installed --upgrade tensorflow==2.8.0
<Test Tensorflow install>
python
import tensorflow as tf;print(tf.reduce_sum(tf.random.normal([1000, 1000])))
<Install models-master Git hub repository>
pip install git+https://github.com/tensorflow/models
conda install -c anaconda protobuf
<CD into Models/research folder>
protoc object_detection/protos/*.proto --python_out=.
conda install -c anaconda git
pip install git+https://github.com/philferriere/cocoapi.git#subdirectory=PythonAPI
<Install Object Detection API>
cp object_detection/packages/tf2/setup.py .
python -m pip install --use-feature=2020-resolver .
<Test object detection running test.py within the models/research folder>
python object_detection/builders/model_builder_tf2_test.py
